Showing posts with label Tutorial. Show all posts

Saturday, February 22, 2014

Review: Fusion Beauty Ultraflesh Shinebox Highlight and Shimmer Kit

Hello there beautiful people!!!

Today I'm gonna review  Fusion Beauty Ultraflesh Shinebox Highlight and Shimmer Kit that I got from StrawberryNET as their Blogger Collaboration Program. If you haven't heard about StrawberryNET.com they are one of the world’s largest online retailer of discount makeup, perfume, skincare and haircare, stocking over 30,000 products from 600+ leading brands – up to 60% OFF. They also offer FREE shipping on all orders anywhere in the world, which is awesome!!!! Aside from FREE Shipping the site also offers loyalty programs for customer and affiliate programs for bloggers. 

I'm a fan of shimmery stuff so when StrawberryNET.com offers me about this collaboration program I join it in a heartbeat!! The package comes after two weeks and to tell you the truth I totally forgot that I was joining this program #LOL but then a mail come from the post office to tell me that I have to pick up he package directly at the post office.


The package is super safe inside a layer of styrofoam and those peanuts thingy (what's it called anyway?). The inside sealed has been open so I guess one of the custom people open it to check what's inside but other than that the package is super save!!


Thursday, January 23, 2014

Resep: Nasi Kaldu ala Sekar

Ola!!

Lagi-lagi aku mau bagi-bagi resep masakan yang mudah dan gag ribet. Masakan ini lumayan sering aku buat jaman masi nge-kost dulu karena gampang dan gag makan waktu. Tapi mendingan jaman ngekost ya? Minimal rame di kostan lha sekarang tinggal sendiri lebih gag asik (TAT). Anyway resep dan step-by-stepnya sebelumnya sudah aku post sih di Instagram cuma gag ada salahnya juga kan aku buat postnya lagi disini. Seperti biasanya bahan-bahan untuk masakan yang aku post biasanya bahan-bahan yang mudah didapat dan tidak harus sama persis sih hanya bumbunya aja sama.

Bahan-Bahan (untuk 3-4 orang):
1/2 Kaleng Jagung Pipil Manis
10 Bakso Kecil (potong jadi 4)
1 Bawang Bombay (cacah kasar)
6 Bawang Putih (cacah halus)
2 Cup Beras
Margarin (Blue Band)
1 Telur Ayam (kocok lepas)
1 Sachet Kornet Sapi

Bumbu-Bumbu:
Garam
Merica
Gula
Kaldu Bubuk (Boleh Ayam/Sapi)

Cara Memasak:

Wednesday, January 22, 2014

Recipe: Orange Jelly Wedges

Hey!! Today I'm gonna share another easy recipe for you and it's gonna be a dessert. I first saw this when I went to Bandung earlier this and we eat at a small ramen restaurant called KUMA Ramen. I eat this spicy (but not so spicy) ramen and then I order a Sunkist Jelly for dessert because the name sounds interesting. After the jelly come I thought to myself that I can make it myself too! So cut to the chase and here's how I made it.

Ingredients:
- Oranges
- Jelly Powder
- Sugar
- Water

Tools:
- knife
- citrus juicer
- sauce pan
- spatula

How to Make:

DIY Drawer Organizer

Ever had a messy drawer? I know I have.... I use to a few small box container to put inside the drawer but different furniture have different sizes so I can't buy the same boxes. It doesn't look nice on my drawer too... And then I saw one of those drawer divider but I didn't really like the prize and plus there's a measurement issue too. Finally I though why not make my own?? I can make it in any size I like and it'll definitely fits nicely inside my drawer!!

Material:
- Cardboard
- Wrapping Paper
- Glue

Tool:
- Box Cutter
- Ruler
- Pencil / Ballpoint

Sunday, January 12, 2014

DIY Bling Bling Necklace

Hey there!! I hope you're not bored yet from my multiple post of the day but this time I'm gonna show you how to make this pretty bling bling necklace. I first saw this necklace on iLook at Net TV and when I visit my friend Nela at Malang she has the same big bling bling beads like the one I saw on iLook so I ask her if she can give me some of hers. This necklace is quite easy to make and didn't take a lot of time too.

Materials:
Big Beads (I usually saw this particular beads at craft store or sewing supplies store).
Jump Ring
Chain
Lobster Clasp

Tools:
Pliers


Tuesday, December 3, 2013

Tutorial: Membeli Domain Pribadi via Pasar Hosting dan Mengalihkan Blog ke Domain Sendiri

image

Kalau liat judulnya memang terlihat cukup panjang ya? Tapi aku bingung sih mau kasi judul apa lagi hi hi hi.... Jadi asal mula aku membuat post ini adalah karena udah lama kepingin punya domain sendiri tapi gag pernah jadi-jadi karena terkesan ribet dan jujur aja waktu abis beli aku sendiri gag tau caranya untuk seting sana-sini. Setelah berkali-kali trial and error selama berhari-hari akhirnya bisa juga prosesnya dan kupikir mungkin banyak juga yang ingin punya domain blog sendiri tapi takut ribet atau apalah.... Makanya aku pikir kenapa enggak berbagi aja kan? Langkah-langkah yang aku share disini adalah langkah-langkah yang aku lakukan mulai dari membeli domain sampai dengan mengalihkan URL dari URL blogspot.com ke domain yang telah aku beli. Untuk tempat pembeliannya sendiri aku beli melalui Pasar Hosting karena pada saat itu harganya yang paling cocok he he he... Untuk layanan hosting lainnya harganya berbeda 10-20 ribu soalnya. Tadinya sih mau pake layanan luar seperi GoDaddy atau Name Cheap tapi setelah dirupiahkan kok malah ada tambahan biaya dan mahal pula jadinya, akhirnya pilihan jatuh ke Pasar Hosting karena selain harganya murah dapat bonus seperti E-Mail Forwarding dan ID Protection walau masih belum begitu jelas caranya he he tapi lumayanlah berhubung gratis hihihi kalau di layanin hosting lain ada yang bayar lagi soalnya. Udah ahh lanjut yukk cusss..... Oh ya gambarnya lumayan banyak supaya jelas langkah-langkahnya jadi harap maklum ya.

Cara Beli Domain via Pasar Hosting:


Buka website http://www.pasarhosting.com/ dan nanti akan muncul seperti gambar di atas.


Masukkan nama domain yang kamu mau nanti akan dicek apakah domain tersebut sudah terdaftar atau belum. Kalau belum bisa langsung klik huruf pada panah di atas.


Kalau sudah di-klik akan dibawa ke halaman baru seperti di atas dan klik tulisan "Daftar Domain Saja".


Pada halaman baru pilih "Domain Registration", "I want PusatMedia to register a new domain for me" dan masukkan nama Domain yang diinginkan pada kolom kosong. Domain baru yang aku pilih adalah "crochetandlipstick" jadi itu yang aku masukkan ke dalam kolom kosong tersebut.


 Setelah itu akan muncul nama domain pilihan dengan extension yang berbeda-beda dan dengan harga yang berbeda-beda pula. Tinggal centang domain yang kita inginkan lalu "Add to Cart".


Akan muncul halaman baru lagi untuk mengkonfigurasi pilihan domain. Di Pasar Hosting DNS Management, E-mail Forwarding dan ID Protection itu gratis jadi silahkan dicentang juga kemudan klik "Update Cart".


Kemudian konfirmasi pembelian, apabila sudah yakin lalu klik "Checkout".


Pada halaman "Checkout" isi data diri untuk registrasi dan billing info.


Setelah registrasi selesai akan muncul invoice untuk pembayaran beserta no. rekening pembayaran.


Apabila membeli beberapa domain sekaligus bisa juga dipilih mana yang mau dibayar terlebih dahulu atau langsung dibayar sekaligus.


Bila domain yang sudah dibeli tersebut sudah dibayar baik melalui transfer, ATM, Paypal, kartu kredit dll maka segera konfirmasi pembayaran. Caranya adalah buka website Pasar Hosting kemudian klik tab "Pemesanan" kemudian setelah halaman yang baru terbuka pilih "Konfirmasi Pembayaran" yang letaknya paling bawah.


Pada halaman konfirmasi pembayaran isi kolom-kolom yang sesuai.


Kemudian akan mendapat e-mail berisi invoice, konfirmasi pembayaran dan pemberitahuan bahwa domain yang diinginkan sudah berhasil registrasi dan horee!! Domain baru sudah berhasil dimiliki. Nah setelah punya nama domain trus gimana donk? Berikutnya adalah mengalihkan dari alamat lama ke alamat baru. Kalau aku dari http://hanaiyzm.blogspot.com ke domain baru yaitu http://www.crochetandlipstick.com.

Kalau beli via Pasar Hosting untuk setingnya bisa melalui dua link yaitu:
- http://manage.pasarhosting.com
- http://manage.pusatmedia.com
Berhubung aku sukses mengalihkan blognya via manage.pasarhosting jadinya aku share dulu langkah-langkahnya via itu ya.

Cara Mengalihkan Blog ke Domain Baru:

Via manage.pasarhosting.com

Buka https://manage.pasarhosting.com kemudian masukkan e-mail used id dan password yang telah diregistrasi sebelumnya. Jangan lupa pilih tab "Customer.

Setelah log-in masukkan domain yang menjadi tujuan (punyaku crochetandlipstick) lalu klik panahnya.


Pillih "DNS Management" di halaman baru dan klik "Manage DNS". Setelah itu akan muncul halaman pop-up.


Aku lupa ambil gambarnya tapi setelah muncul halaman pop-up di kolom-kolom pada gambar di atas nantinya sudah ada kolom yang terisi sebelumnya. Nah kolom-kolom tersebut diklik lalu dihapus satu per satu.


Setelah terhapus semua pilih kolom "CNAME" lalu "Add CNAME Record". Untuk mengisi kolom yang baru tersebut marilah kita pergi ke halaman setting pada "Blogger"


Pada halaman seting di blog silahkan klih bagian "Basic" di bawag "Setting". Pada bagian "Publishing" klik link "add a custom domain". Pada kolom kosong yang muncul masukkan domain yang telah dibeli dan jangan lupa kalau url domain tersebut harus dimulai dengan "www" (misalnya www.crochetandliptick.com) lalu klik "SAVE".

Setelah itu akan muncul tulisan merah error dan ada dua "CNAME" yang muncul di bawahnya. Setiap CNAME terdiri dari dua bagian yaitu Name/Label/Host dan Destination/Target/Points.
- CNAME yang pertama sama untuk seluruh blogger yaitu "www" untuk Name/Label/Host dan "ghs.google.com" untuk Destination/Target/Points.
-  CNAME yang kedua itu spesifik untuk blog masing-masing.


Kembali ke "Control Panel" di manage.pasarhosting.com setelah "Add CNAME Record" di-klik akan muncul halaman baru yang harus diisi sesuai dengan CNAME pertama yang diperoleh melalui Blogger.
- Host Name diisi dengan www
- Value diisi dengan ghs.google.com. (Jangan lupa buletannya yang kedua itu di-klik juga kalau tidak nanti akan muncul error).
- Untuk TTL aku biarkan sesuai dengan yang sudah terisi sebelumnya (gag ngerti itu apa hehehe).
Setelah diisi klik "Add Record"


Kemudian pilih "Add CNAME Record" lagi kemudian isi sesuai dengan Host Name dan Value spesifik yang didapat melalui Blogger kamu lalu setelah selesai klik "Add Record"


Setelah dua CNAME tersebut diisi kembali ke halaman seting Blogger dan pilih "SAVE". Kalau sukses akan tampak seperti gambar di atas dan Blog kamu sudah sukses dialihkan ke alamat yang baru. Oh ya apabila ada yang tidak bisa mengakses blog jangan takut dulu namun tunggu beberapa hari supaya si Google bisa menyesuaikan sistemnya.

Via manage.pusatmedia.com


Buka https://manage.pusatmedia.com dan akan muncul halaman di atas lalu pilih Management Tools - Manage DNS.


Apabila sudah diseting melalui manage.pasarhosting.com maka akan muncul kolom seperti yang sudah sudah diisi sebelumnya. Jujur aku agak bingung kalau lewat yang ini. Kemarin bolak-balik gagal melulu he he he.


image


Add me on your list  ^^


or Maybe Visit My Online Shop 

Follow my blog with Bloglovin

Monday, December 2, 2013

NOTD: Mermaid's Dream (with Tutorial)


I got so many pending post so I'm still continuing on making another post right now. At first I'm not really interested in doing this post but since some of my readers ask me how I do this particular look I'm thinking why not right? Coincidentally I take a step-by-step pictures on how I did it too! I called the look Mermaid's Dream because I use two of Etude House's Bling in The Sea Nail Polishes which has a Mermaid theme.
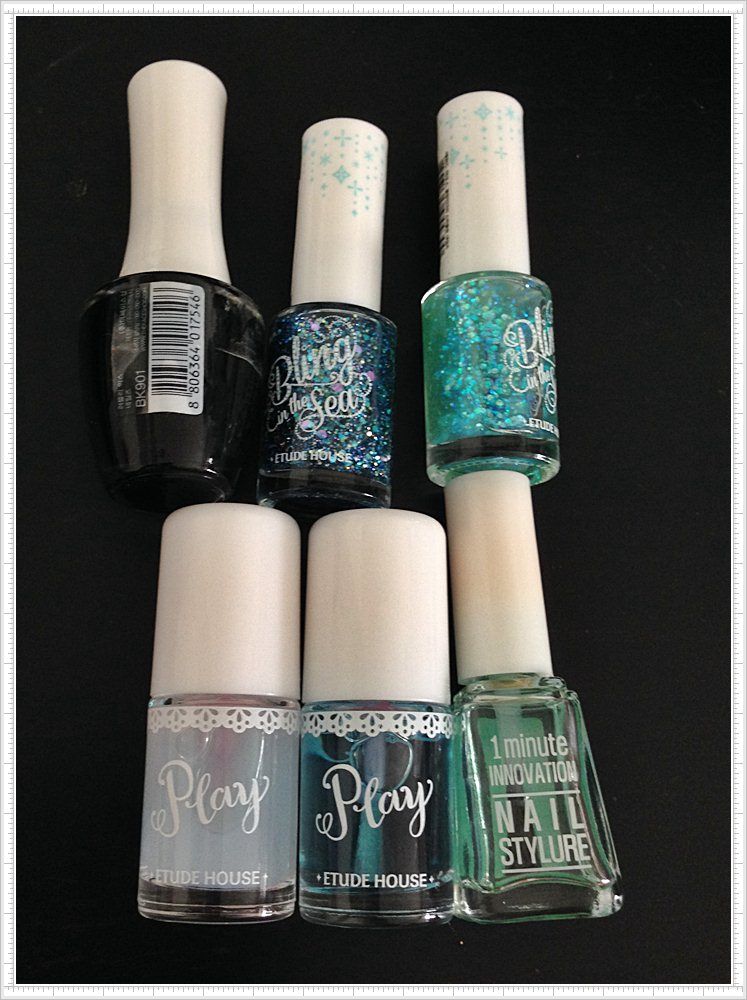

These are the products that I use:
- Etude House Play Nail Strengthtener
- Etude House Play Nail Peel-Off Base Coat
- The Face Shop Nail Polish #Black
- Etude House Bling in The Sea Sparkling Nails #04 BBL601 Mermaid's Tears
- Etude House Bling in The Sea Sparkling Nails #06 BBL603 Shiny Jewelry Box
- It's Skin Nail Stylure Top Coat

Sunday, December 1, 2013

Tutorial: CL's Falling in Love MV Inspired Look


As I promised in my previous post I'm gonna post a tutorial on how I do the CL inspired look from the 2NE1 Falling in Love music video. I should've warn you though that there are gonna be a lot of pic but I hope you'll like it.


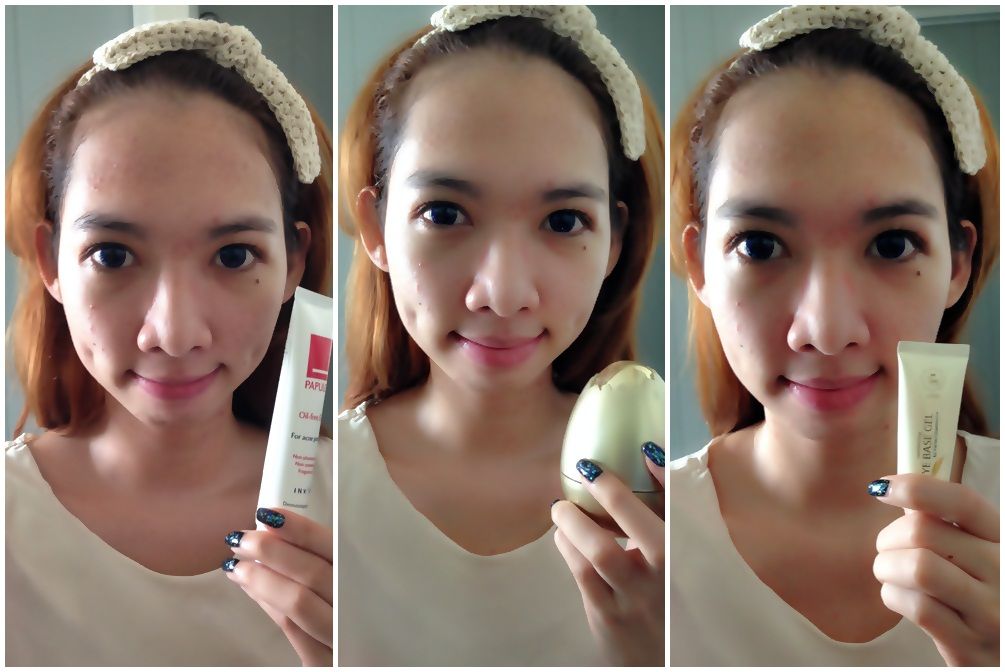
1. Moisturize your face with your usual moisturizer. I use Papulex Oil Free Cream.
2. Use your favorite primer and this time I use Tony Moly Egg Pore Silky Smooth Balm.
3. Don't forget to prime your eye lid and under eye especially if you have oily lid like I do. I use Viva Eye Base Gel.

Wednesday, November 20, 2013

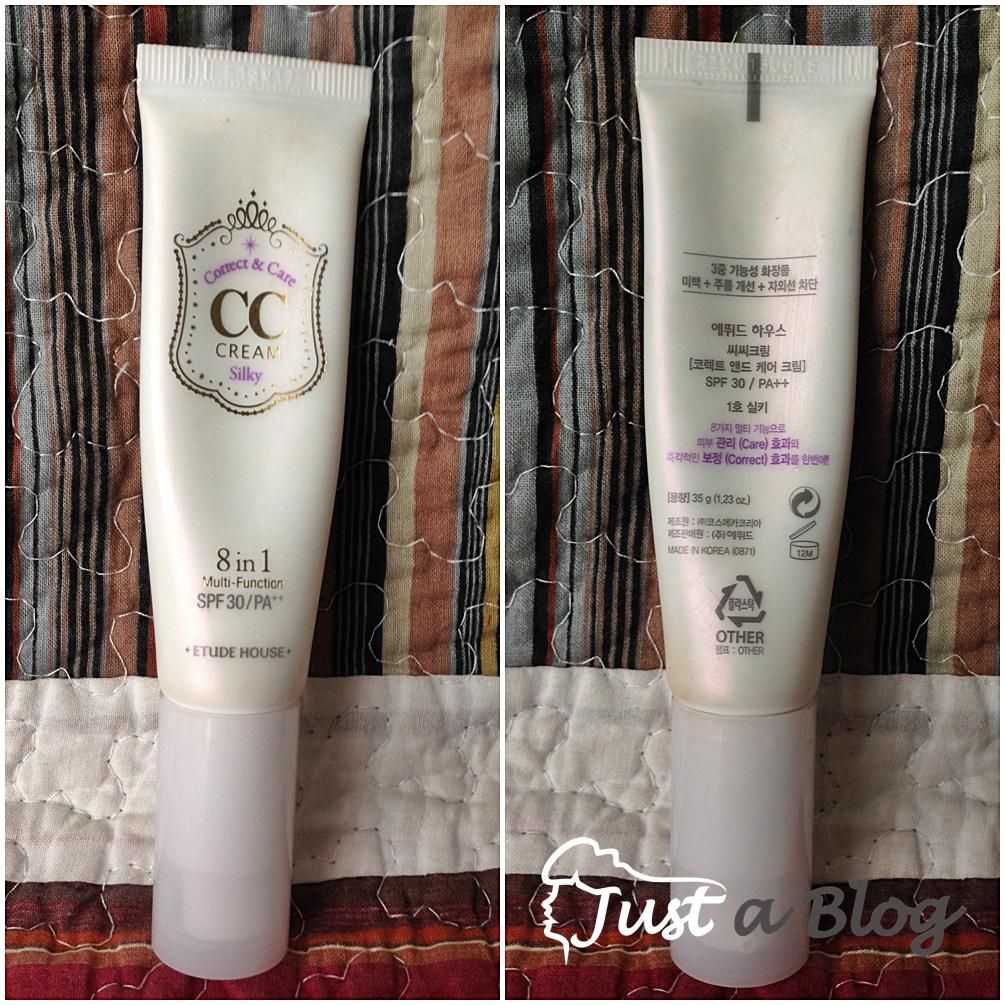
Review: Etude House CC Cream in Silky and Pure Make-Up Tutorial


I'm in a mood of making another review for today but it's not another lippie stuff and I know I've made a decision to make a theme review but since it's almost runs out I decided to make a review about it. It's Etude House Correct and Care Cream in Silky type. Why I choose Silky? Well as much as I love a dewy look I've tried my friend's CC Cream in Glow before and I don't really like it. It makes me look too oily and it doesn't has any coverage. Silky gives more coverage (albeit light one) and has a matter finish.

About Etude House CC Cream:
CC Cream is a term for Correct & Care. It supposedly gives skincare and makeup effect at once for instant skin color tone correcting and skin condition care. The concept is 8-in-1 Multi-function daily application cream formulated with Rock Rose extract supplies natural corrective care coverage and skin protection.

Makeup Function:
- Brightening, Tone Correction
- Smooth, Even Coverage
- Wrinkle Coverage
- Complexion Glow Coverage

Skincare Function: 
Antioxidant Anti-Aging Care
Complexion Care Coverage
Moisture Care
UV Protection Care


Tuesday, November 12, 2013

Time to Clean My Brushes and DIY Brush Spot Cleanser


It's time for me to cleanse my brush so I might show you guys how I cleanse my brush and I also gonna show you my DIY brush spot cleanser that I use cleanse my brush after I put on my makeup. I did the thorough brush cleansing every one or two weeks depending on how dirty my brush is he he he...


Uwahhhh... Take a look at those dirty brushes!!


This is what I use to cleanse my brush. I bought it because it's BOGOF and was gonna use it for the dishes (which I did) but then I try to use it to cleanse my brushes instead of the usual shampoo and it turns out great!! It cleanses well, keep the bristles soft and smells really good too!!

Friday, November 1, 2013

Tutorial: Acid Wash Jeans Nail Art


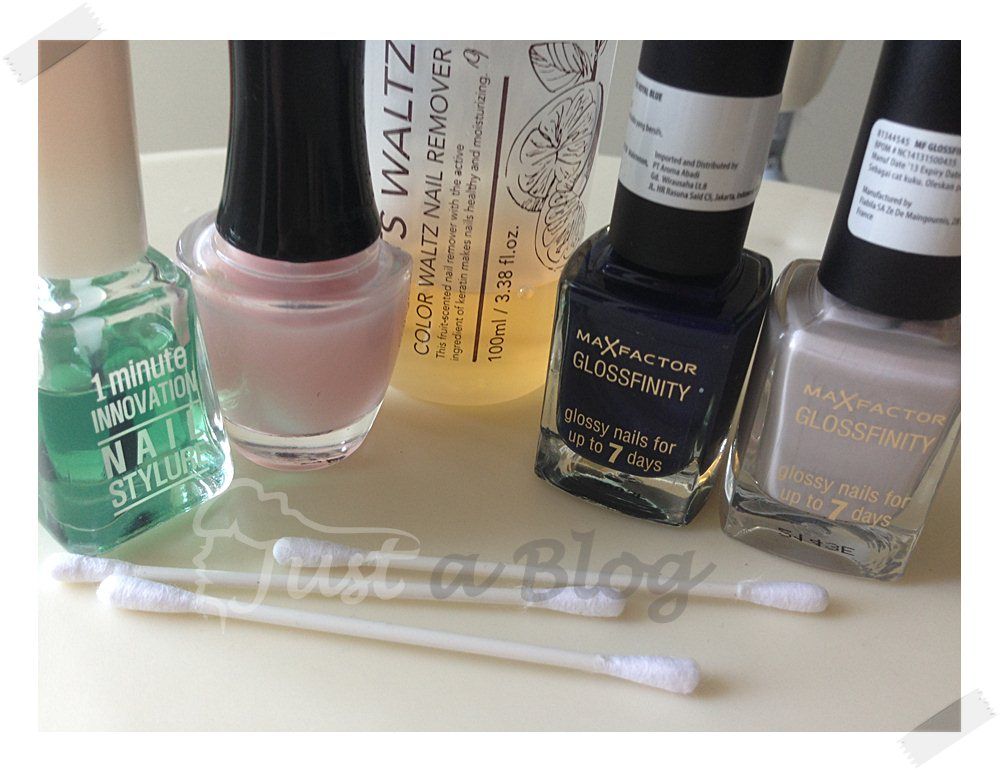
I never interested in doing my nails before but for the past few months I was kinda into it and bought more and more nail polishes . I'm not good at nail art either since I'm bad at drawing and I don't have a steady hands, they just keep trembling!! But then... I saw this cute nail art that makes your nails look like an acid wash jeans. It was easy to make and didn't need a lot skill. Perfect for me doncha think !! Here's what you need.....


Materials:
- Base Coat
- Top Coat
- Nail Polish Remover
- Cotton Bud
- Dark Blue or Blue Nail Polish (I use Max Factor Glossfinity Nail Polish in Royal Blue)
- White or Grey Nail Polish (I use Max Factor Glossfinity Nail Polish in Noisette)