It's been a while since my last DIY Project right? So today's post is about DIY Brush Tree. What's a Brush Tree you say? Well Brush Tree is a thingamajig that you use to help you dry your makeup brushes vertically and off the counter. By drying you makeup brushes that way, the bristles are protected and also protect it from contamination. Here's what the Brush Tree looks like.
Showing posts with label Craft. Show all posts
Sunday, March 15, 2015
Wednesday, August 6, 2014
Crochet Scalloped Lace Headband
God Day...!!
Because the internet connection is really good I'm really motivated to make another blog post today and now I'm gonna share a crochet pattern for a scalloped headband. This headband is really pretty and quite easy to make although I spend a great deal of time in making the pattern for it.
Tuesday, June 17, 2014
Crochet: Zombie Amigurumi
Hello!!
or maybe visit my Shop
Just a quick update on my crochet project. As you might've known before if you like to read my blog I'm a fan of anything's that creepy and cute which my friend find weird but apparently I'm not the only one that's into this kind of stuff he he he... Anyway... Last week I broke my Teddy Bear key chain so I want another cute thing to replace it... And... Since it's a bother to buy one cos I might not find what I like why not crochet a cute key chain myself then! I saw this uber cute Zombie Amigurumi on Pops de Milk Blog and decided to make one.
I don't quite understand the instruction for the brain part so I just did a random single crochet and slip stitch on the head. Now that I take a closer look it kinda look like a huge Rose??
Since I don't have a small beads or black felt I just use a black yarn to make the eyes and mouth and I did a few modification on the body parts because I use a smaller hooks and yarns. Instead of 4 single crochet for the arm I make mine in 6 single crochet and instead of 6 single crochet for the legs I make mine in 8 single crochet. So what do you think? Is it cute? If you like to make one you can go to Pops de Milk Blog for the pattern (click here) Oh and I would love if you can share other creepy and cute amigurumi patterns for me.. Toodles... ^^
or maybe visit my Shop
Saturday, June 7, 2014
Crochet: Heart Headband
I've been neglecting my crochet project for so long now but finally I can make another update!! I've been tinkering with a headband project too and it's gonna be up soon ^^. So I made this headband by request from a friend. She wants a cute headband for her baby girl and since it's a bit difficult to get an exact size for her head I made the headband size adjustable. That way she can still wear it when she gets bigger.
Isn't it cute!! I want to make one for myself too!!
Friday, February 21, 2014
Crochet: Blu-Ray Topper (Table Runner)
Hi...
I think I've mention before that my apartment is undergoing a renovation and it's been collecting dust everywhere right? Well I've finally finished cleaning them up and tidying all of my stuff since I now have more space to keep stuffs and things. I use to have several big plastic containers (the one that had wheel on it) but now I'm planning to get rid of them cos it's been taking up so much space. Anyway it had nothing to do with the renovation though but my Blu-Ray player looks really plain so I wanted to make it look nicer. I decided to put a crochet on top of it but when I search for a table cloth or table runner the one that comes out are mostly in doily type and that looks like a grandma thing
. So I google for a while and I found a perfect one at Crochet n More. Here's what mine looks like...

Friday, February 14, 2014
Crochet: Rainbow Clutch
Hi again!!
Sorry I haven't post any crochet-related post for a while.... I do make several crochet projects but most of them are a gift for someone and I forgot to take pictures of it too... #sigh... Anyway here's my latest crochet project that I remember to take pictures on.
Isn't it cute!! The reason I made this clutch is because I use backpack a lot lately when I go out because I carry a lot of stuff and I put my phones inside. So when I need to use my phone or when there's a call or text it's quite bothersome to look for the phone inside the bag and of course I can't hear the phone when it's ringing. I don't like to put my phone on my pocket and if I carry the phone on my hand it's also quite tricky (especially when I window shop or discount hunting #LOL) so I decided to make one.
Wednesday, January 22, 2014
DIY Drawer Organizer
Ever had a messy drawer? I know I have.... I use to a few small box container to put inside the drawer but different furniture have different sizes so I can't buy the same boxes. It doesn't look nice on my drawer too... And then I saw one of those drawer divider but I didn't really like the prize and plus there's a measurement issue too. Finally I though why not make my own?? I can make it in any size I like and it'll definitely fits nicely inside my drawer!!
Material:
- Cardboard
- Wrapping Paper
- Glue
Tool:
- Box Cutter
- Ruler
- Pencil / Ballpoint
Monday, December 16, 2013
Crochet: Rainbow Grocery Bag
Good Evening!!
I hope your day went well today ^^. Tonight I just wanna share a crochet grocery bag that I finished making about a month ago and it also took about a month to finish. I never made such a big project before because I lack the patient to do it but ever since I saw a certain Crochet Mesh Bag at craftgawker I tell myself that I have to make one!! The first bag was made by Ami from All About Ami and she has a lot of beautiful and cute crochet pattern to share but the original pattern is from Knit-O-Matic. Ami made a modification from the Knit-O-Matic pattern and I made a modification base on Ami's pattern #LOL that's quite confusing right? The reason I made another modification is because I use smaller yarn and hook size, both the original and Ami's pattern use 4mm crochet hook while I use 2.5mm crochet hook so I have to modified the pattern to make it bigger. Knit-O-Matic use one color and Ami's made it into twotone color but I make mine into a rainbow color YAY!! Curious what it looks like?
I've been into rainbow theme lately and it's also a good way to use up a few of my yarn collection because apparently I have turn into a yarn hoarder. I keep buying more and more yarn and it's turn into some kind of addiction (TAT).
Tuesday, November 5, 2013
Tidy Up Those Annoying Cables With DIY Cable Tie (Crochet Cable Tie)

I have this problem with gadget.. You see... I have all these stuff and all of these gadget charger and all of it just gets tangled up like crazy. I even broke one of my USB cable charger because the cable always getting tangled on my charger pouch and I kinda yank it and the cable plug fell off
. Not to mention all my gadget have different plug so I tend to carry several cable for charging and add that with another earphone in it my pouch was a mess inside. I use to use one of those wire tie to tidy up my cable but I always loose them, same thing happen when I use rubber band or worse I bought several cable tie and all of them are missing now. I don't like to use that wire tie thingy or rubber band cos they look ugly but I don't want to keep buying cable tie either. So what did I do? I crochet them!! Why didn't I think about it sooner!! 


I'm still experimenting so I made several kinds of cable tie. There's one with a small button clasp, one with a crochet button (a regular button is fine too BTW) and another where I sew the cable tie onto the cable itself so I won't loose it ever again!!
Saturday, October 19, 2013
Crochet: Instagram Inspired Pouch

I'm gonna show another crochet pouch that I made and it's an Instagram inspired pouch. I actually made a similar one before earlier this year but that one was made in continuous round (blog post here) while this one is made with several rectangle shape single crochet round join together.
I actually made it like this because I saw someone posting a small Instagram picture with a similar design. Instead of making the rainbow square on the left side she incorporated the rainbow in the purse itself.
Friday, October 18, 2013
Crochet: Rose Pouch


I just wanna share this ultra kawaii crochet pouch that I made.

I made it because I want to use my stock of pink and red yarn.
Monday, October 7, 2013
Crochet: Totoro Amigurumi


A quick post since I'm pretty lazy today but still wants to be at least somewhat productive so I'm just gonna post a bunch of picture of Totoro from the anime My Neighbour Totoro or Tonari no Totoro in Japanese. Totoro is one of my favorite anime from Studio Ghibli but then when it comes to Studio Ghibli nothing is bad he he he I love em all!!
I've actually have made this amigurumi months and months ago for my nephew Aradea but forgot to take pictures. The only one I had was this.

I know it's totally biased but isn't my nephew's cute!!!

Saturday, September 28, 2013
Crochet: Finn The Human Pouch
Helloooo!!!!!
I've made this Finn The Human Pouch from Adventure Time Series for my new Online Shop Collection but it was sold even before I put the picture #LOL. I'm gonna make another one as soon as I had the time.
This is what the front pouch looks like. I made Finn's face square because it'll look weird if I made it round like the original picture. It doesn't seem to match with the pouch shape.
This is the back pouch looks like. I made Finn's ear too ^^
Thursday, September 19, 2013
Crochet: Chandelier Earring
Howdy!!
After rambling about my acne problems in the previous post I'd like to cheer myself up by sharing this kawaii crochet earring pattern!! This another cute earring that is easy to make and perfect for beginners.
Materials:
- local cotton yarn
- steel crochet hook #4 (around 2.5mm)
- ring
- earring hook
- clear nail polish
Pattern:
Make 7 ch and ss in the first ch.
Make 1 ch and in the 7 ch ring make 1 sc and *1 sc, 3 ch and 1 sc*, repeat ** 2 times. Continue with 4 sc, 3 ch and 3 sc and then ss in the first sc.
Ss in the next sc, 3 ch, 1 sc, 3 ch and 1 sc in the 3-ch-sp. 3 ch and continue to the next 3-ch-sp 1 sc, 3 ch and 1 sc. 3 ch and continue to the next 3-ch-sp 1 sc, 3 ch and 1 sc. 3 ch and ss in the second sc from the 3-ch-sp. FO
Add clear nail polish to the fasten off part and then attach ring and earring hook.
Terms:
ch = chain
ss = slip stitch
sc = single crochet
3-ch-sp = 3 chain space
FO = fasten off
NOTE:
If my explanation is a bit confusing I'm gonna draw the pattern later ^^
Saturday, September 14, 2013
Crochet: Wheel Earrings
I don't what to call this earrings but since it has a wheel like shape so I guess that's the name #LOL. Easy and fast to make too.
Material:
- Steel Crochet Hook #4
- Local Cotton Yarn
- Earring Hook
- Ring
Pattern:
Do a magic circle, ch 1 and sc in ring 12 times (12 sc).
Ch 4 (1 dc + 1ch) and 11 dc in each sc, sl st in the 3rd ch (12 dc).
Ch 1, *hdc, dc, hdc* in the ch-1 sp. Repeat ** in each ch-1 sp. Sl st in the first ch. FO
Pretty easy to make right??
Terms:
Ch = Chain
SC = Single Crochet
HDC = Half Double Crochet
DC = Double Crochet
Sl St = Slip Stitch
FO = Fasten Off
Wednesday, September 11, 2013
Crochet Flower Inspiration
Sorry for neglecting the crochet part of the blog for some time now... But I promise I'm gonna try to post more on crochet stuff. Today I'm gonna post on a crochet flower inspiration. I got the inspiration when I went to a local craft supply store in Jogjakarta.
Monday, May 6, 2013
Crochet Granny Square Slippers
Hello again..!!!
After such a long hiatus I finally had the time and also mood to make another post and this time I'm gonna make a post on how to crochet a granny square slippers. This slipper is my favorite slipper because it's fairly easy to assemble and there's a lot of interesting granny square motifs and patterns that are available on the internet.
Because of that I'm not gonna post about the pattern on how to make the granny square pattern but rather on how to assemble the slipper. Basically you need 6 granny square to make a slipper so you have to make a total of 12 granny square in order to make a pair of slipper.
To join the squares you can either sew them or join them by doing an sc (single crochet) around the square but I prefer to do an sc to join the squares. Here's how you made them (pls note that I'm suck at drawing so I hope this chart can help you)
![]() |
Bottom Slipper Chart |
So you basically join the bottom part consisting of 4 granny squares like the chart above and fold the pink squares in half. Join the "B" pink and blue part of the squares in the indicated part and you'll make the bottom part of the slipper.
![]() |
Upper Slipper Part |
Saturday, February 23, 2013
Easy Crochet Slipper

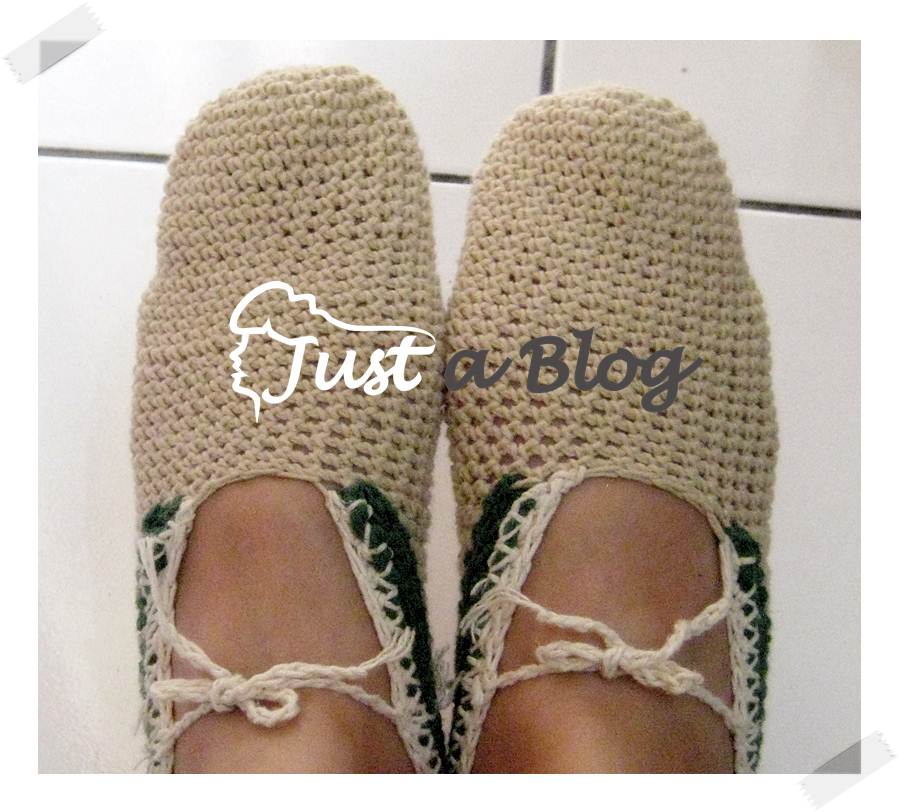
The size of this slipper is adjustable and can be made into any size. The color is weird because I choose the yarn color that hasn't been used and other leftover yarn. I use steel crochet hook #4 and local cotton yarn to make this slipper, but the slipper will be warmer and nicer if I have a thicker yarn though...
Material:
- steel crochet hook #4 (2.5 mm)
- local cotton yarn
- tapestry needle
Pattern:
(FrontPattern)
Round 1: Do a magic ring and 6 hdc and continue increasing the round like the way you make amigurumi. For example the next round will be like this:
Round 2: 2 hdc in each hdc around: 12 hdc
Round 3: (2 hdc in next hdc, hdc in next hdc) around: 18 hdc
Round 4: (2 hdc in next hdc, hdc in next 2 hdc) around: 24 hdc
Round 5: (2 hdc in next hdc, hdc in next 3 hdc) around: 30 hdc
Round 6: (2 hdc in next hdc, hdc in next 4 hdc) around: 36 hdc
Round 7: (2 hdc in next hdc, hdc in next 5 hdc ) around: 42 hdc
Round 8: (2 hdc in next hdc, hdc in next 6 hdc ) around: 48 hdc
Continue increasing the round until the diameter is slightly smaller than the width of the foot.
Note: Round 9 – 27 creates the toe part of the slipper. This part is adjustable depending on the length of the feet but it shouldn't be longer than the ankle.
Round 9 – 27: hdc in each hdc around: 48 hdc. Continue until the desired length.
Note: Row 28 establishes the length for the middle and bottom part of the slipper. Make sure it snuggle tight enough and not too loose. I use 24 hdc at first but it was too short so I have to modified them later, think around 30-32 will suits better, so make sure you make them wide enough.
Row 28: hdc in next 24 sc: 24 hdc
Note: Row 29 – 43 creates the rest of the slipper. To adjust the size just increase or decrease the row.
Row 29 – 43: ch 1, turn, hdc in next 24 hdc: 24 hdc
Finish off. With yarn needle, sew back of slipper together.
I made a mistake of doing shorter round of hdc so I modify it by adding another yarn with a different color. Why different color? Because if it's the same I'm gonna get confuse #LOL. I add another hdc round from the middle part while decreasing the round so the slipper can fit better on my feet.
Apparently I made another mistake and the slipper is still too big... Yeah the more I use them to more loose the slipper is so I add another modification on the middle part and add a strings of crocheted chain to tie the slipper.
And yess... I should've made a longer tie for the slipper. But it's cute, it's warn and nobody gonna see it anyway... Whoopps you guys seen it キャー♪ o(>▽<*)(*>▽<)o キャー♪. Anyway I hope this post is helping you on making a warm crochet slipper for yourself or your loved one (although it was a bit confusing #erp).
Visit my online shop Pernak Pernik Sekar if you like ^^
Tuesday, February 12, 2013
Utterly Easy Golden Sphere Charm Bracelet
A few days ago I went to a local craft shop in Jogjakarta to see if there's something new and I saw this cute golden sphere thingy.
I really like the fact that there are several color of this ring because it used to be only in silver color, now they have in blue, white, pink, green and many other color. Anyway here's what the finished charm bracelet looks like...
Aren't they cute??? So I bought them and thinking it would look really good if I made it into a charm bracelet. I only use one of the sphere because if I use several of them it's gonna look too over the top. Here's the materials that I use:
Flat Needle |
I use this needle thingy with a flat edges to make the sphere into a charm.
Golden Chain |
I really like this golden chain because the chain ring are big and it's already looks great as it is.
Golden Ring |
I really like the fact that there are several color of this ring because it used to be only in silver color, now they have in blue, white, pink, green and many other color. Anyway here's what the finished charm bracelet looks like...
Pretty!! |
Close Up on the Sphere |
I got a matching golden clamp too! |
Simple but really cute |
Visit my online shop Pernak Pernik Sekar if you like ^^
Subscribe to:
Posts (Atom)